Installing KwikWork CADViewer
The following steps are required to install KwikWork CADViewer.
Overview
There are four components for creating SVG renditions and displaying SVG file types.
- KwikWork DWG Caching Service - A Windows only background service responsible for
- Downloads the DWG files to the conversion server
- Executes the CADViewer conversion process
- Uploads the SVG rendition back to the FileNet custom KwRendition class
- Updates the request to completed
- CADViewer- third party software from TaylorMade Software bundled as cadviewer.zip
- The CADViewer component can be installed on the application WebSphere instance or on a remote server, however, CADViewer is can only be installed on Windows or Linux.
- CADViewer Converter - Linux or Windows server application that converts DWG files to SVG files
- CADViewer JSViewer - Viewer for displaying SVG files
- KwikWork CADViewer - FileNet Viewer Plugin that acts as a wrapper for CADViewer
- Downloads the SVG files to the server
- Redirect the iFrame to CADViewer for display
- Sweeps Process:
- FileNet Sweep process searches the object store for DWG files and executes the KW DWG Sweeps Code Module
- KW DWG Sweeps Code Module creates "request" records in the custom class KwQueueRequest of documents that are queued to be rendered to SVG
Install KwikWork DWG Caching Service
This is a Windows only service.
- Copy "KW DWG Caching Service.zip" to the server
- Copy to any location (i.e. c:\IBM\) and unzip
- Edit <location>/properties/config.properties
Note: if previously installed, the config.properties file was copied to <user home>/KwikWork/ directory. This file in the user home location can be modified or can be renamed/deleted and the file will be copied again to the user home location.- Set the URI value to the FileNet server whose object store contains the DWG files for conversion
- Set the object store ID
- Set user ID
- Set password - password must be encrypted using jasyph (http://www.jasypt.org) with key from zip file's readme.txt
- Set localPathToDWGFile which is the temporary working directory
- Edit <location>InstallDWGCacheService(32 or 64).bat
- Set the PR_JVM to your installed JVM
- Open a command prompt to the directory and run "InstallDWGCacheService64.bat -i" (or 32 for 32 bit processor)
- Start the service in Windows Services and set to auto start
- A log file will be generated at c:\logs (this can be set in the <location>/log4j.xml)
- If you have any issues with the service running:
- Verify your JVM path is set correctly in InstallDWGCacheService64.bat
- Verify the JVM version is at least 1.8.0_112 or greater
- Verify your permissions or reinstall using administrator. If you have appropriate permissions, the following key will have 4 folders in regedit:
HKEY_LOCAL_MACHINE\SOFTWARE\Wow6432Node\Apache Software Foundation\Procrun 2.0\KwikWorkDWGCacheService64\Parameters\
Install CADViewer
CADViewer can be installed on the same WebSphere server or on a remote server (Windows or Linux only).
Same Server Configuration
- In WebSphere:
- Navigate to Applications, Enterprise Applications, Add new application: cadviewer.war
- cadviewer_war should now show in Enterprise Applications.
- Navigate to Environment, Shared Libraries, Add New:
- Select server scope
- Name: cadviewer
- Classpath: path to <WebSphere AppServer filepath>\cadviewer_war.ear\cadviewer.war\WEB-INF\classes
(i.e.: C:\IBM\WebSphere\AppServer\profiles\AppSrv02\installedApps\ECMNode02Cell\cadviewer_war.ear\cadviewer.war\WEB-INF\classes) - Apply and Save
- Navigate to Applications, Enterprise Applications, Navigator Application, References, Shared library references, navigator module, add cadviewer and save.
- Navigate to Applications, Enterprise Applications, Add new application: cadviewer.war
- See Configure CADViewer Instructions below
- Setup up recurring task to delete temporary DWG files stored for rendering to SVG
- On AIX / Linux:
- Edit crontab to run every 30 min to find files that are 30 mins old and delete the folder and files:
- Verify your IBM install path exists: /opt/IBM/kwcn/cache/ - update line 4 as needed to correct path to IBM install as defined in KwikWorkViewer-<date>.jar/viewer.properties - localPathToDWGFile.
- From terminal: crontab -e [username]
- Type "i" to insert
- Paste: 0,30 * * * * find /opt/IBM/kwcn/cache/dwg/* -mmin +30 -exec rm -r {} \;
- Esc, ":x" to save
- On Windows:
- In the KW Viewer zip, locate the "removeDWGFiles.bat".
- Edit the file so that the 2 path locations match the KwikWorkViewer-<date>.jar/viewer.properties - localPathToDWGFile
- Setup a recurring nightly task to execute the .bat file.
- On AIX / Linux:
Remote Server Configuration
- On the remote server, install and configure a SFTP program such as OpenSSH for Windows https://github.com/PowerShell/Win32-OpenSSH/wiki/Install-Win32-OpenSSH
- Set the SFTP service to start automatically
- Create or use a user with permissions to read/write to use with the SFTP processes.
- If installing the CADViewer component on WebSphere:
- Navigate to Applications, Enterprise Applications, Add new application: cadviewer.war
- cadviewer_war should now show in Enterprise Applications
- Set the context path: Enterprise Applications > cadviewer_war > Context Root For Web Modules set to "/cadviewer"
- Navigate to Applications, Enterprise Applications, Add new application: cadviewer.war
- If installing on Apache Tomcat:
- The configuration files were preconfigured for C:\tomcat as tomcat_home
- Copy the WAR file to the <tomcat home>/webapps/ directory and start the tomcat service.
- Configure the CADViewer Component - see Configure CADViewer instructions below.
- Set up the tomcat engine as a service and auto start by following instructions in the tomcat/bin/service.bat file.
Configure CADViewer
- If WebSphere, navigate on the server to <appserver filepath>\cadviewer_war.ear\cadviewer.war\
If Tomcat, navigate to <tomcat home>/webapps/cadviewer/ - Edit cvjs_config_servlets.xml, search and replace the following values:
- If WebSphere:
- http://ecm.devenchoice.org:9081/ with your URL
- C:/IBM/WebSphere/AppServer/profiles/AppSrv02/installedApps/ECMNode02Cell/ with your path.
- If Tomcat:
- http://ecm.devenchoice.org:9081/ with your URL
- C:/tomcat/webapps/cadviewer with your path
- If WebSphere:
- If running Linux, the path to the converter must be changed from windows to linux:
- Search and replace cadviewer.war/converters/ax2019/windows/ with cadviewer.war/converters/ax2019/linux/
- Change:
<init-param>
<param-name>ax2019_executable</param-name>
<param-value>AX2019</param-value>
</init-param>
To:
<init-param>
<param-name>ax2019_executable</param-name>
<param-value>ax2019_L64_19_04_16</param-value>
</init-param>
- Optionaly, to change the encryption key, navigate to <webapp>\<cadviewer>\html\fileviewer.jsp and edit "secretKey" to a unique 16 character value and save the file.
- The secretKey must match the KwikWork Viewer viewer.properties secretKey
- Reset the web service
Install KwikWork Viewer Plugin
- Open the KWCN-DWG-Viewer-<date>.jar file with a zip utility
- Edit viewer.properties as needed to match the server settings and save.
- The secretKey must match CADViewer fileviewer.jsp secretKey and must be 16 characters.
- Save the Jar file
- Log into KwikWork Content Navigator Portal, Administration View Settings, Plug-ins:
- Add the new plugin: KwikWorkViewer-<date>.jar and save
- Viewer Maps, Edit the KWCN Viewer Map
- Add new mapping:
- For Repository select "FileNet Content Manager"
- For viewer select KwikWorkViewer
- In New File Types, manually add the following:
dwg
application/dwg
model/vnd.dwf
application/acad
image/vnd.dwg
svg
image/svg+xml - Click OK
- Move this mapping up to the top of the list
- Save
Create FileNet ACCE Sweeps Process
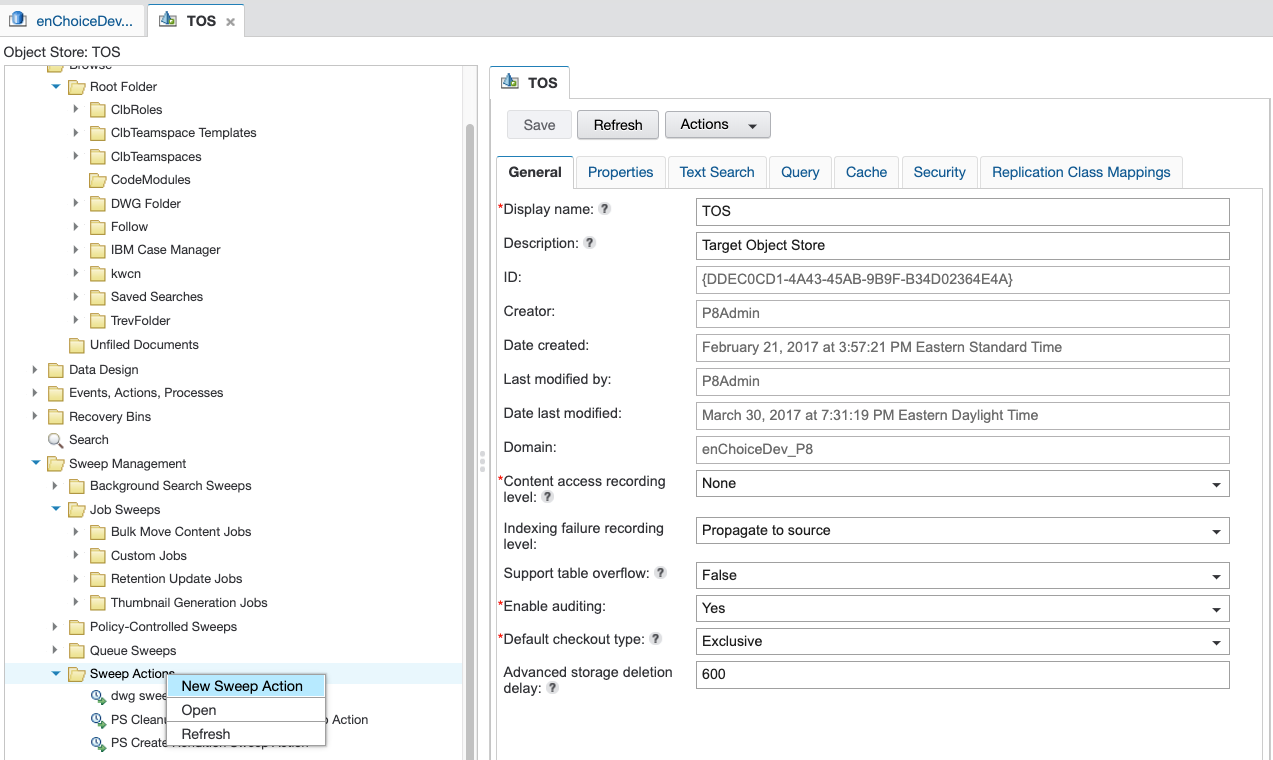
Navigate to Sweep Management - Sweep Actions - New Sweep Action
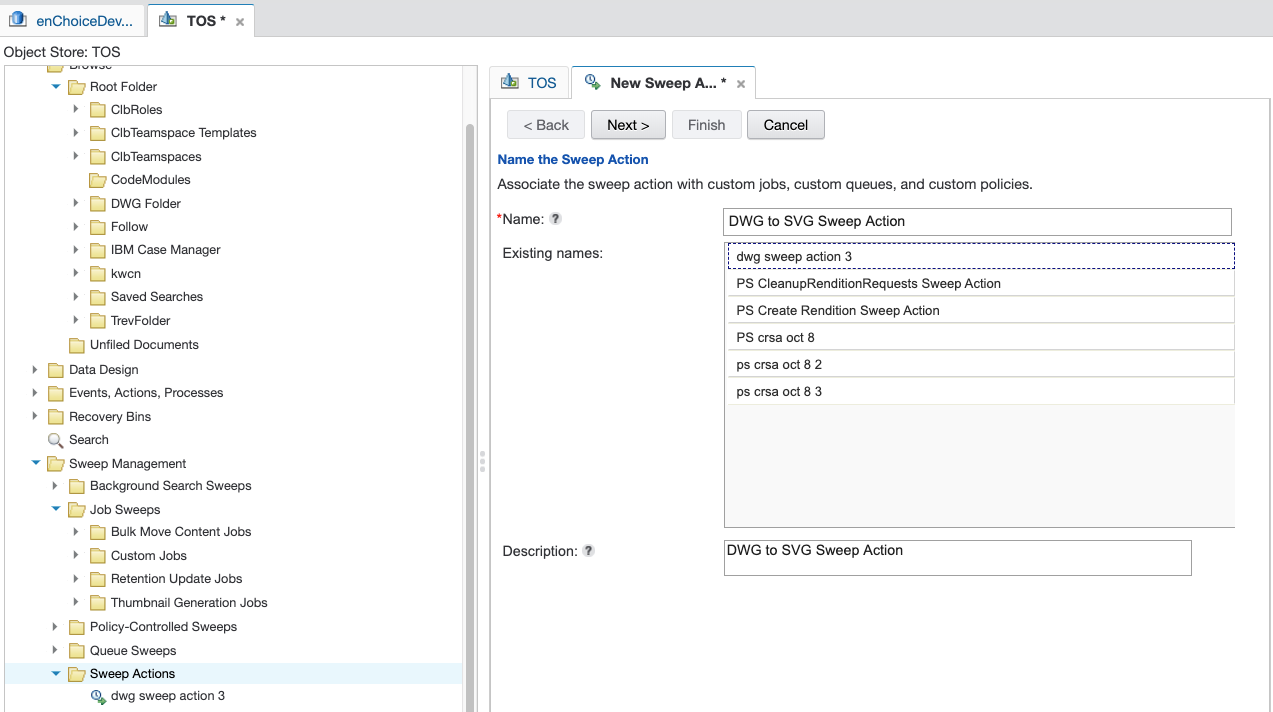
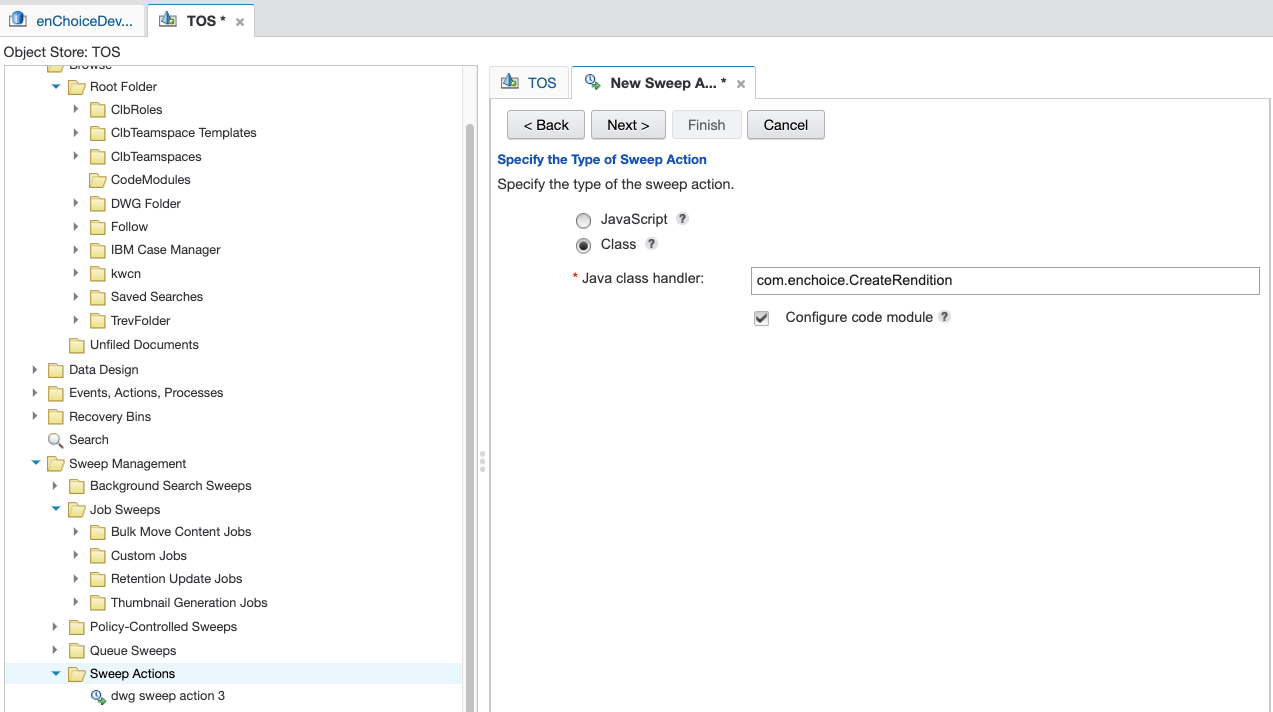
Set Java class handler to com.enchoice.CreateRendition and check Configure code module
- Check "Configure code module"
Name the code module and import the KWCN Create Rendition Sweeps Jar file
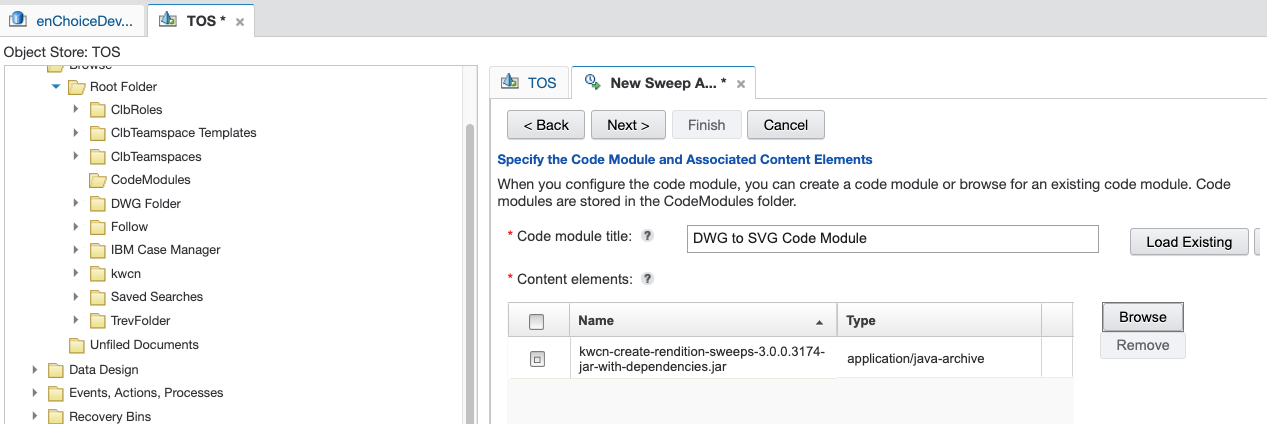
Move Next and Finish
Next, create a Job Sweep - Custom Job for a one time sweep, or to continuously run, create a Sweep Policy. A filter expression is required, at a minimum the sweep process needs MimeType = ‘application/dwg’. Other filters can be added such as modifiedDate.
Set the sweep action to the sweep action created in the previous steps.