Configuring Custom Case Numbering Scheme
KwikWork includes the ability to create custom case numbering schemes with the use of the KwikWork Server Extensions. The solution uses an Identifier|Separator|Prefix|Number schema that should meet all of your needs and requirements. This is a guide to enable and configure this optional functionality.
Step 1 Create a Custom Object in FileNet
Using FileNet Enterprise Manager or ACCE, create a new custom object.
Add a property definition of type 'String' with a length of 4000. Make a note of the name of this property since it will be used in the configuration of the custom case numbering.
Create an instance of the custom object and note the ID of the object.
Step 2 Update KwikWork Server Extensions
- Extract the config.properties file from the 'kwcn-server-extensions.jar' file that is contained in the plugins folder of the installer package using an archiving tool such as 7-zip.
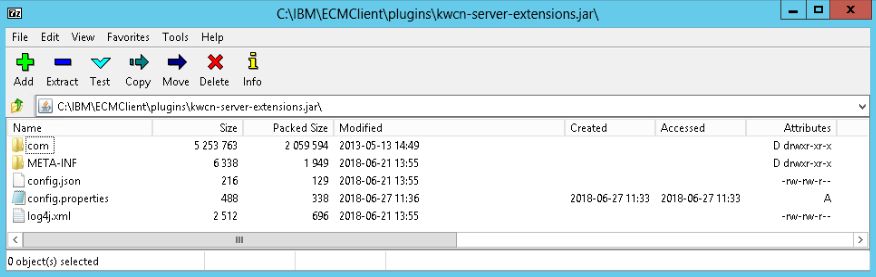
Open the config.properties files using a text editor. Change the value of the 'caseNumberingConfig' to the ID of the custom object that was created in step 1 and set the 'caseNumberIngConfigProperty' to the name of the property definition that was created for the custom object.
CODEcaseNumberingConfig = {F7AB8717-D2E7-4DE8-A580-2FE1BA807AD0} caseNumberingConfigProperty = KWseConfigStop the Websphere server for Filenet, then open the 'kwcn-server-extensions.jar' archive located n the 'IBM/ECMClient/plugins' folder using an archiving tool such as 7-zip.
Delete the the config.properties file in the jar and add the config.properties file that was updated with the parameters of the custom object.
Close the jar then start the Websphere application server for FileNet.
Step 3 Create Change Preprocessor for Case Folder
Create a new Change Preprocessor Action with the following class handler.
CODEcom.enchoice.kwcn.serverextensions.CaseNumberingPreprocessor- Add the change preprocessor created above to the case class for which the custom numbering will be configured.
Step 4 Configure Case Numbering Format
- Extract the config.json file from the 'kwcn-server-extensions.jar' file that is contained in the plugins folder of the installer package using an archiving tool such as 7-zip.
Open the config.json file using a text editor. Change the value of the 'symbolicName' to the name of the symbolic name of the case class for which the custom numbering will be used.
CODE"caseTypes": [ { "symbolicName": "KW_Legal", "symbol": "KWCNRE", "prefix": "2016", "digits": 10, "separator": "_", "sequence": 1 } ] }Update other properties as required for the case solution. The table below provides a brief description of each option that is available.
Property Description symbolicName Symbolic name of the case class` symbol Symbol that is used at the beginning of the case identifier prefix An identifier that is added before the number such as the year digits Number of digits that will be used in the numerical portion of the case identifier separator A separator that separates the symbol from the remainder of the case identifier sequence The first number in the sequence - Search for the instance of the custom object and copy the updated contents of the config.json and set it as the value of the 'caseNumberingConfigProperty' then save the changes.
- Future configurations of the case numbering scheme can be made by editing the property directly in FileNet.
Resources
- For information on creating change preprocessors see https://www.ibm.com/support/knowledgecenter/SSGLW6_5.2.0/com.ibm.p8.ce.admin.tasks.doc/changepreprocessors/cp_setup.htm